Showing posts with label PME Intensive Diploma. Show all posts

Monday, 21 November 2011

Day 7 - Intensive PME Diploma - Royal Icing

Day 7- Royal Icing

Today was the last day of our Royal Icing module and it was a very difficult one!
We started off piping lace by using templates again.


We also covered off how to brush embroider- I have actually done a tutorial on youtube on this.  It is very easy and quite effective J

Tutorial


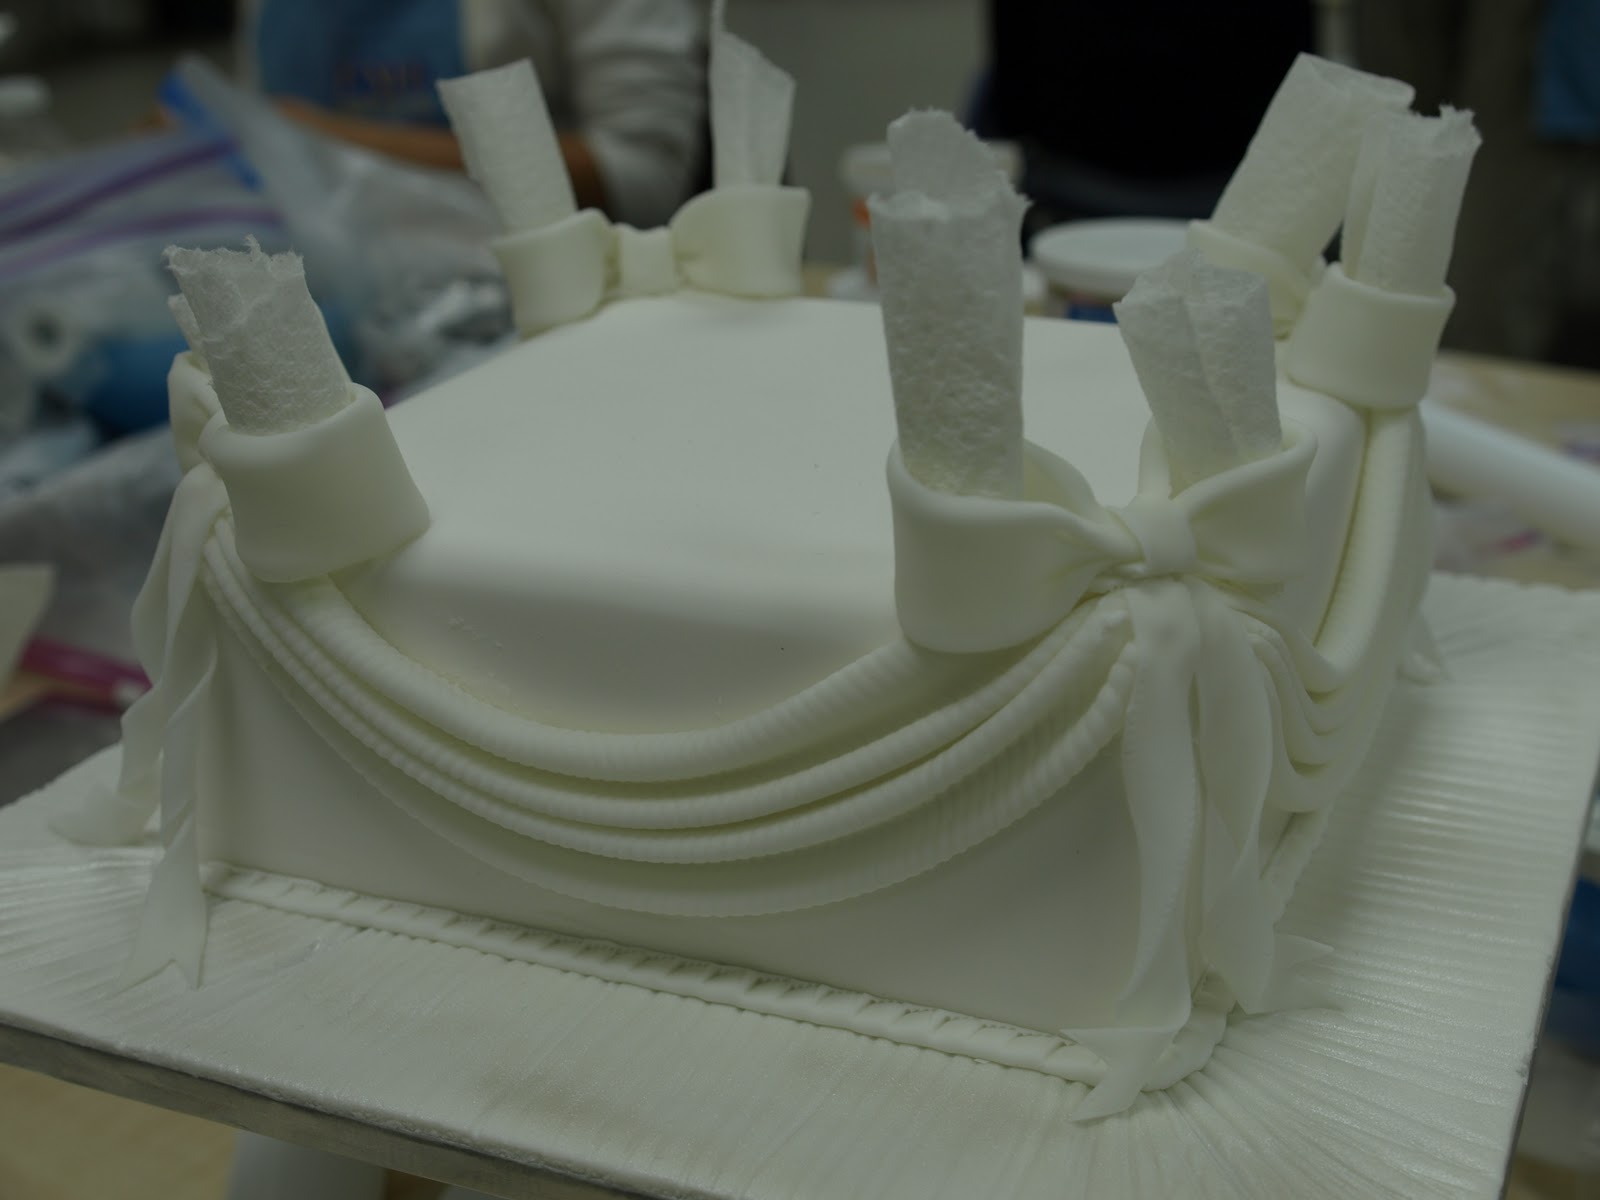
We then started on royal icing extensions; these are decorations that come off the side of the cake.  These decorations are extremely delicate and very time consuming.  I don’t think these types of decorations are that common these days, and am not sure if customers would really appreciate the time and effort that goes into them!


The extensions took up most of the lesson- so much time effort and patience is required for this kind of work.

The last past of the lesson was all about finishing off our royal icing cake.  After putting ribbon round the cake, we piped roses and stems round the middle.


We then had the awful job of taking our collars off our pieces of acetate. I was extremely nervous about this part and was convinced I was going to crack my collar- thankfully it came off in one piece.

We popped the collar on our cake and then placed the swan (which I think is beautiful finished in lustre) and our letters and flowers.


This was Tony's cake- our fab teacher!
 Stunning detail!


Sugar flowers module tomorrow - I love to make flowers, so really looking forward to the next few days – yay!

Sunday, 20 November 2011

Day 6 - Intensive PME Diploma - Royal Icing


Day 6 and it was all about Royal Icing again!!
Today was all about royal icing.  We started by filling bags with different nozzles and created the following designs using templates.

I think that the use of templates is a great idea and will be looking into creating some templates myself.  The swan will look especially pretty once assembled on my cake.


We then moved onto making royal icing flowers.  I popped some colour into my bag to create some gorgeous looking flowers.  I have seen these flowers being sold in shops- I now know how to do these myself.


I tried a chrysanthemum, but these were not as good as the roses.

After the flowers, we royal iced our dummy cake and then used a scrapper to make a rim round our cake.


We move onto sugar flowers next week- yay!

Friday, 18 November 2011

Day 5 - Intensive PME Diploma - Royal Icing

Day 5 and it was all about Royal Icing.


I don’t work that much with royal icing as I think that cakes with buttercream and sugarpaste coverings are more common these days. Also lettering on cakes tend to be with the use of cutters, moulds or even fabulous tools like Clickstix.
I only really use royal icing to pipe round the edge of cakes, to give a shell border and that is about it...  I used to make royal icing using egg whites, but ever since setting up Cake Masters, I was aware of various regulations regarding uncooked egg in food items.  Instead of using egg whites to make royal icing I would use meri-white meringue powder.  I learnt in class today that Wilton Colour Flow (or albumen) is much better to use to get a stronger royal icing which you can make amazing structures with. I found that with my royal icing made with meri-white, my structures would quite annoyingly break and were quite brittle.
Tony, our tutor showed us how to mix up royal icing using Wilton colour flow, icing sugar and water as well as showing us how to make our own piping bags from parchment paper- I am officially an extraordinaire in this department as I made about 20 cones today!
After filling our piping bags we started with straight lines and attempts at writing.


We then used the wilton nozzles 44 and 43 to create these gorgeous scrolls.  Today’s class took me back in the day when my royal icing birthday cake would have a very fancy royal iced, hand piped border- I today was creating these sorts of designs myself and thoroughly enjoyed myself.


The next part of the lesson was to cover a board and have a go at piping an “S” and “C” scroll and a border, it was all a bit wobbly!


Next we moved onto something more challenging- a royal icing collar! Have you seen these before? Very old school- but amazing engineering!
We started by piping very thin lines and then dots on those lines- after carefully doing this on top of acetate on a template, we moved to flooding.


I was quite nervous about this part, and thought that I might over flood my collar. I was very careful and managed to fill it all in perfectly.


I will take a picture of the collar, and will let you know if I can get it off in one piece once dry- I am very used to my pieces breaking, so have my fingers crossed that it all goes well tomorrow.

Just as a note, although I don’t think I will be using much of what I learnt today on actual cakes that I make, I thoroughly enjoyed myself, as most of today was very new to me J
Look forward to seeing how my collar is doing when I get in tomorrow morning- yes there is a Saturday class -no rest for the wicked!

Thursday, 17 November 2011

Day 4 - Intensive PME Diploma - Sugarpaste

Day 4 of the intensive PME diploma and it was such a fun day.
The morning started off with making borders for our 6 inch round cake.  The technique used was Broderie Anglaise.  After cutting out various lace shaped borders, we used eyelet cutters to cut out floral patterns.  What do you think of the border- quite pleased with it and its delicate effect.

After putting the border on, we modeled our bride and groom.  I decided to model an Indian couple and had so much fun doing this. I could have spent the whole day adding little details to make the couple more life like and to add a little character here and there.


After putting the veil on the brides head, I noticed a bald patch! I quickly covered up with some hair and fixed it up perfectly.

All the students had a great time modeling, one of the students modeled his groom pushing his bride off the cake!  All the creations were great.
Here is the finished result, what do you think?

At the very end of the lesson we started on royal icing.  Tomorrow, we will get to grips with writing and decorating with Royal icing, very much looking forward it as I don’t work much with royal icing.

Check back in tomorrow for Day 5 and pictures J

Wednesday, 16 November 2011

Day 3 - Intensive PME Diploma - Sugarpaste

Day 3


Day three of the intensive PME diploma.


The morning started with us finishing off the bass relief clown that we started yesterday afternoon.  Bass relief is basically where sugarpaste is modelled to appear raised.  I don't see much of this technique anymore because most people people now days just use moulds.  Moulds are much more intricate these days and 10 times quicker.


Here is a picture of my bass relief clown - don't really like this technique, I think that moulds do a better job.


The next part of the lesson was making a tiered wedding cake.  I must say, this has been the most enjoyable part of the course so far.  


We worked with dummy cakes and first learnt how to cover our square cake. After covering the square cake we covered the board and put a textured pattern around the outside edges of the board.


The textured effect on the edges of the board gave a lovely fabric effect which I will be definitely trying again.


After this step, we started making swags for the sides of the cakes.
Here is a picture of one of my swags- quite pleased with it!


After making 4 swags, we started on the bows for the corners of the cakes, perfect for hiding the messy overlapping corners!


The rolled kitchen roll was used inside of the bows to help hold the shape.
We then placed an iced circular cake on top.


In class today we also talked about stacking cakes with pillars as well as the different types of pillars available on the market. We also talked about transporting cakes, but will be covering more on transporting later on in the course.


I wanted to show you a picture of the classroom and the demo area where Tony our tutor demonstrates various techniques.  The TVs are brilliant, as Tony is able to zoom in on key parts of demos he does.


Looking forward to finishing off the wedding cake tomorrow where we will also be making a bride and groom and also decorating the side of our circular cake with a broderie anglaise trim.  Broderie anglaise is a lovely lace effect and I will show you pictures in tomorrow's blog.